Symmetry
 MirrorMe
MirrorMe Tool
 Gradient Forge Panel
Illustrator Location:
Advanced Toolbar > MirrorMe Tool

Illustrator Location:
Advanced Toolbar > MirrorMe Tool
As the MirrorMe tool has several keypresses for certain operations, we suggest installing the free Astute Graphics plugin Astute Buddy, which creates a panel that dynamically updates to inform you of the various keys which can be pressed in the tool’s current context.
The MirrorMe tool works in conjunction with the associated MirrorMe panel, which should be open and accessible. If you are using the free Astute Graphics plugin DirectPrefs, you can have the MirrorMe panel automatically be shown when the MirrorMe tool is selected.
Illustrator Location:
Advanced Toolbar > MirrorMe Tool
After the MirrorMe tool is selected, provisional symmetry axes will be drawn using thin maroon lines, with their center at the cursor location. As the cursor is moved around, the axes will follow. The number of axes (from 1 to 72) reflects the setting on the MirrorMe panel, and may be changed either by keying in a new value in the panel or by pressing the keys assigned to Decrease Diameter and Increase Diameter in the native Keyboard Shortcuts dialog (the left and right square bracket keys respectively, by default, for English language keyboards).
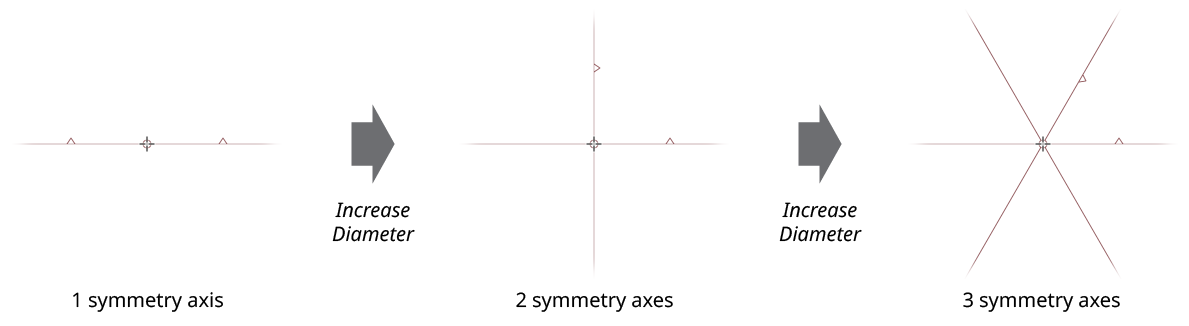
MirrorMe Basic Provisional Axes
The active sector (the area in which any artwork is mirrored to fill the other sectors) is the sector indicated by two small triangles pointing inwards; it is also completely transparent, while the non-active (mirrored) quadrants are semi-transparent white while the axes are still provisional:
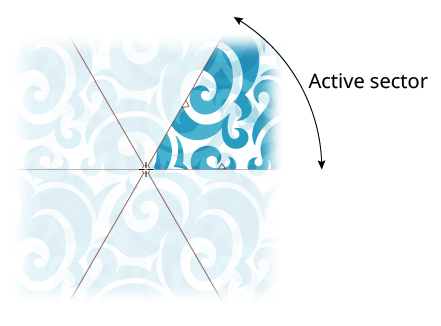
MirrorMe Active Sector
The axes are displayed as solid lines when the default setting Trim and Join Paths is enabled on the panel; otherwise, they are displayed with a long-dash-short-dash pattern.
As the axes are moved, art which is at least partly in the active sector will have its mirrored positions previewed in real time using red wireframes. Paths are shown solely by their geometry (strokes and fills are not shown). Mesh objects are shown using their outside edge. Point text objects are shown by their bounds and include the baseline. Symbols are shown as quadrilaterals outlining their transformed bounds. Raster and placed art are similar, but with a “X” through them. Graph objects and guides are never mirrored.
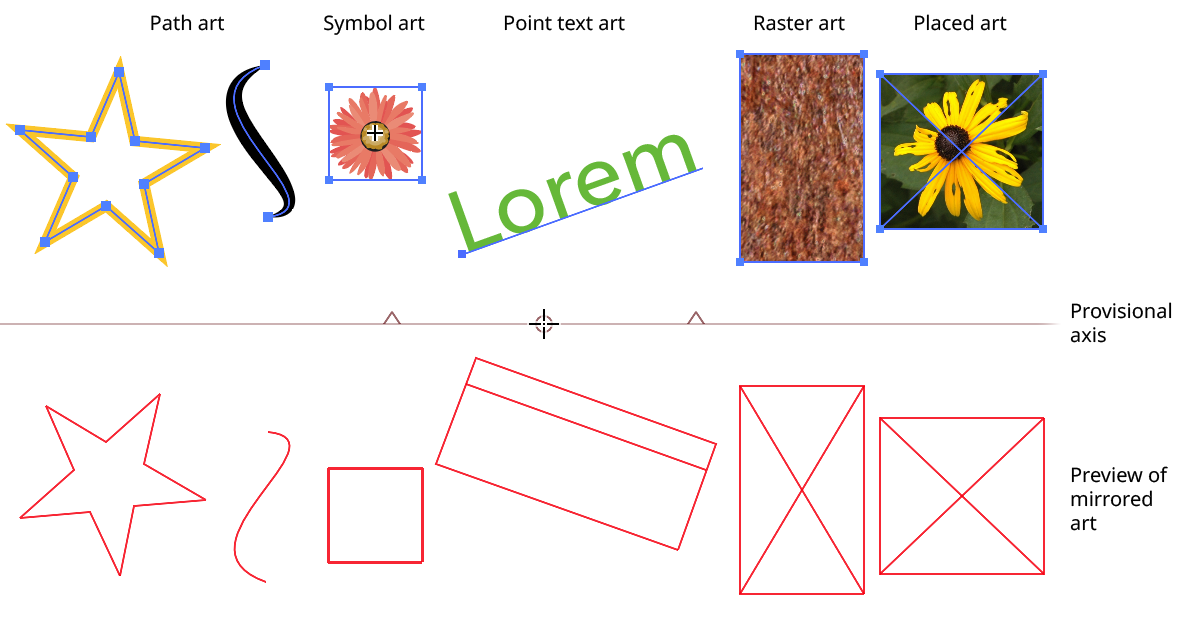
MirrorMe Mirroring Preview
Which artwork is mirrored depends also on which of two modes is active on the panel. When Selected Artwork mode is active, only eligible artwork that is selected (on any layer) will be mirrored. Otherwise, with Entire Layer mode active, all eligible artwork on the current layer will be mirrored. The mode can be changed after the provisional axes have been placed.
With a single axis, artwork is simply mirrored (reflected) across that axis, from the active half into the other half. When there are multiple axes, the mirroring proceeds from the active sector to adjacent sectors, mirroring across each succeeding axis. Thus, the art is reversed in alternate sectors:
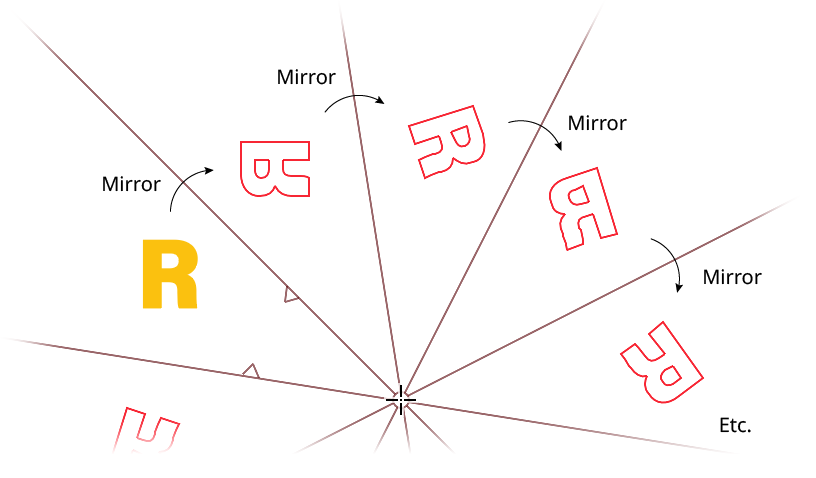
MirrorMe Mirroring Across Multiple Axes
With the default Trim and Join Paths setting enabled, sections of paths which are outside the active sector are trimmed off and its mirrored pieces are joined together to form one or more continuous paths. The preview will faithfully show this:
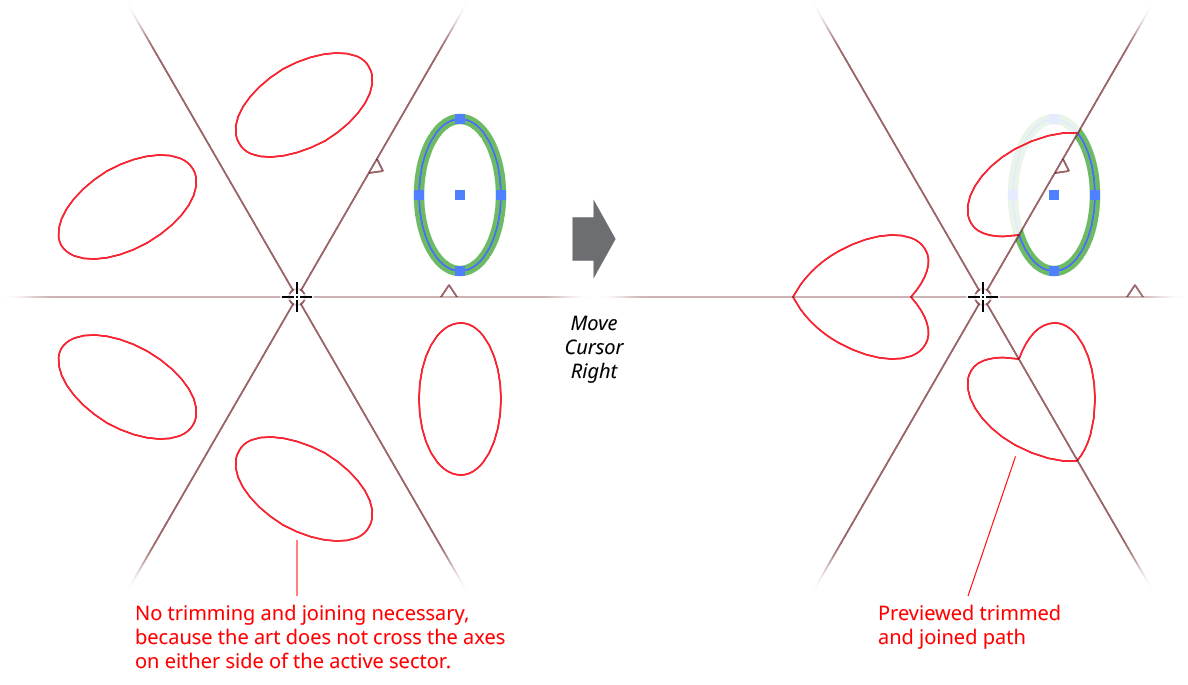
MirrorMe Mirroring Preview Trimming and Joining
The provisional axes will usually need to be rotated to put the active sector into the correct orientation. This may be done in several ways. A new rotation angle may be keyed into the panel. Or (unless the tool preference Initial Drag Positions Origin is enabled), the axes may be dragged, with the initial click also fixing the position of the axes origin. Finally, if the preference Change Active Sector With Shift is enabled, the Shift key may be tapped, which moves the active sector clockwise one position.
Once the mouse button has been clicked or the axes clicked-and-dragged, the axes are still provisional, and may be edited. Doubleclicking on either the small circle defining the axes origin point or on any axis will bring up a dialog which allows numerical control over the origin position, axes rotation, and number of axes (just as on the panel):
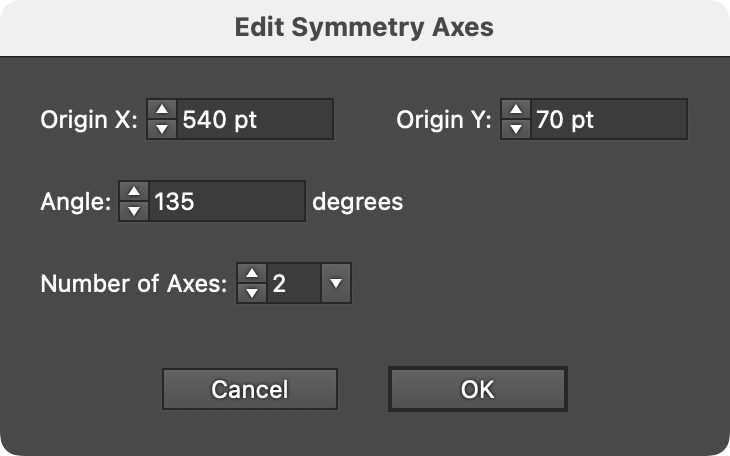
MirrorMe Edit Symmetry Axes Dialog
Dragging the axes origin point will reposition it. While dragging, there are several keypresses which may be utilized:
Shift: Constrains the origin’s movement to 45° increments around the general constrain angle.
Up Arrow/Down Arrow: Changes the number of axes.
1–9: Directly specifies the number of axes.
U: Temporarily disables Smart Guides, if they were enabled before the drag started.
T: Toggles the Trim and Join Paths setting.
Any axis (including the “virtual” axis which appears at the midpoint of the active sector) may be dragged to rotate all the axes. While dragging, there are several keypresses which may be utilized:
Shift: Constrains the axes rotation to angles that are 45° increments around the general constrain angle.
Command/Ctrl: Overrides the snapping that by default occurs when the dragged axis is perpendicular to a curved path segment (indicated with a small magenta dot); the axis will still snap to anchor points that are under the cursor.
Space: Moves the origin.
Up Arrow/Down Arrow: Changes the number of axes.
1–9: Directly specifies the number of axes.
A: Immediately sets the general constrain angle to the current angle of the dragged axis.
U: Temporarily disables Smart Guides, if they were enabled before the drag started.
T: Toggles the Trim and Join Paths setting.
Illustrator Location:
Advanced Toolbar > MirrorMe Tool
When the provisional symmetry axes are in the desired position, they must be applied (finalized) for the artwork to actually be mirrored. There are several ways to do this:
The Apply to Selection/Layer button on the panel may be clicked.
The Enter key may be pressed. If Selected Artwork mode is active, the axes will remain in place (but become provisional again) after the selected artwork has been mirrored.
If the tool preference Display Annotation Dialog is enabled (as it is by default), a small on-screen dialog will be displayed, offering three clickable menu items: Apply to Selection (unavailable if nothing is selected), Apply to Layer (persistent), and Cancel, which releases the provisional axes so they begin following the cursor again.
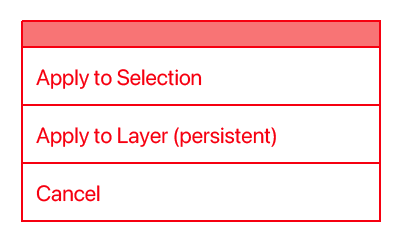
MirrorMe Annotation Dialog
Illustrator Location:
Advanced Toolbar > MirrorMe Tool
Applying MirrorMe symmetry axes to selected artwork is a one-time operation, but applying them to the current layer instead creates axes which remain attached to that layer until they are removed. When layer axes are present, anything drawn into the active sector is immediately and automatically mirrored by default (along with trimming and joining of paths, if enabled). Layer axes are only drawn for the current layer.

MirrorMe Layer Axes
Layer axes can be edited after they have been applied, although this can produce undesirable results when paths have already been trimmed and joined across the axes. A more useful operation is to move or rotate the layer axes while keeping their mirrored artwork in the same position relative to the active sector. This is accomplished by holding down Option/Alt while dragging the axes origin or an axis:
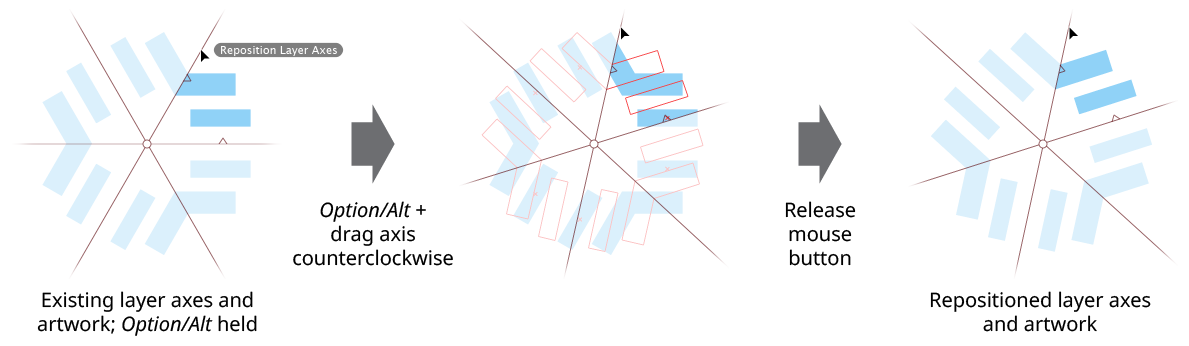
MirrorMe Repositioning Layer Axes
When artwork has a directional live effect attached (such as a shadow), mirroring it works in the same way as the native Reflect tool: the live effect is simply applied to the mirrored object with the same parameters and is not itself “mirrored” until it is expanded:
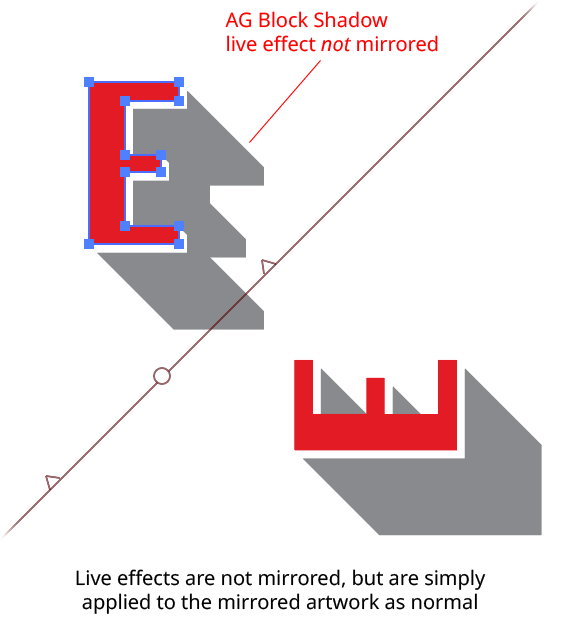
MirrorMe with Live Effects
All mirrored artwork in a set of active layer axes is automatically kept in the visible and locked state by MirrorMe; you should not attempt to manually hide or unlock it. However, the entire layer can be hidden or locked, as can art in the active sector.
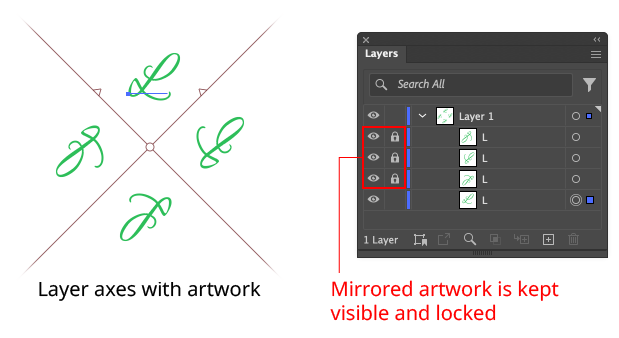
MirrorMe Mirrored Art Status
Illustrator Location:
Illustrator Main Menu > Window > Astute Graphics > MirrorMe
The menu item to show and hide the MirrorMe panel can be found in the main menu under Window > Astute Graphics > MirrorMe.
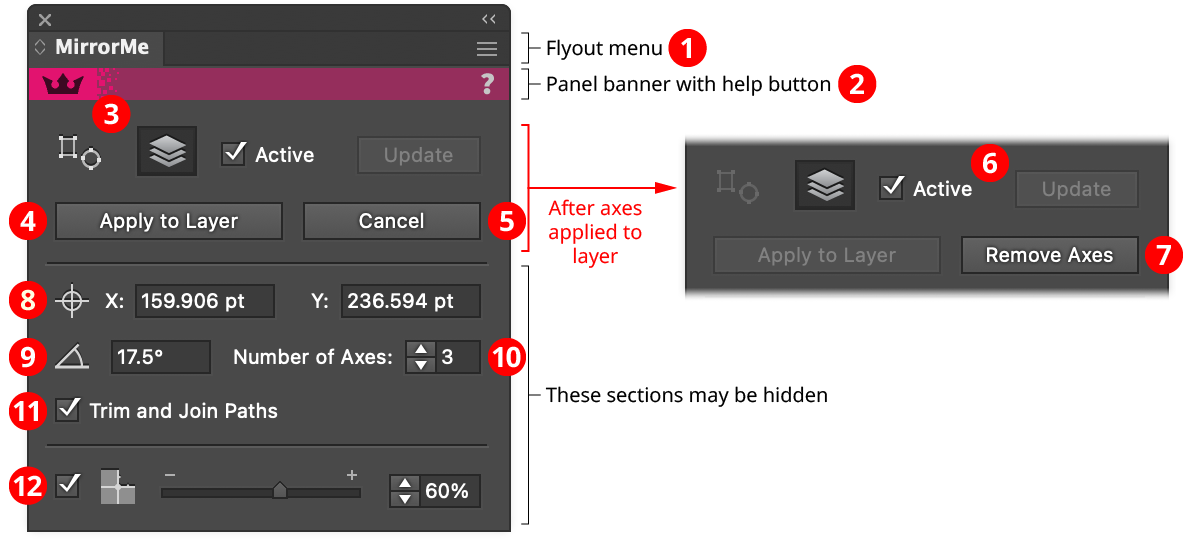
MirrorMe Panel
1. Flyout menu
See MirrorMe Panel: Flyout Menu.
2. Panel banner
The MirrorMe panel banner has a help button on the right which opens the help documentation in the Astute Manager. If this does not automatically appear, please ensure your Astute Manager is running first.
3. Mode buttons
Switches the mode of the tool, between Selected Artwork (in which only the selected artwork is mirrored, as a one-time operation) and Entire Layer (in which all artwork on the current layer is mirrored, and the symmetry axes are retained until they are removed).
4. Apply to Selection/Layer button
Applies the provisional symmetry axes to either the selected artwork (when in Selected Artwork mode) or the current layer (when in Entire Layer mode).
5. Cancel button
Releases the provisional axes without applying them so they begin following the cursor again.
6. Active/Update button
When the checkbox is enabled, edits to an art object on a layer with persistent symmetry axes will automatically update the mirrored sectors. This is generally desirable, but when the Trim and Join Paths setting is enabled, it can make drawing or editing art which crosses one of the active sector’s axes difficult. By disabling the Active setting, automatic mirroring is paused, and will only be applied when the Update button is clicked.
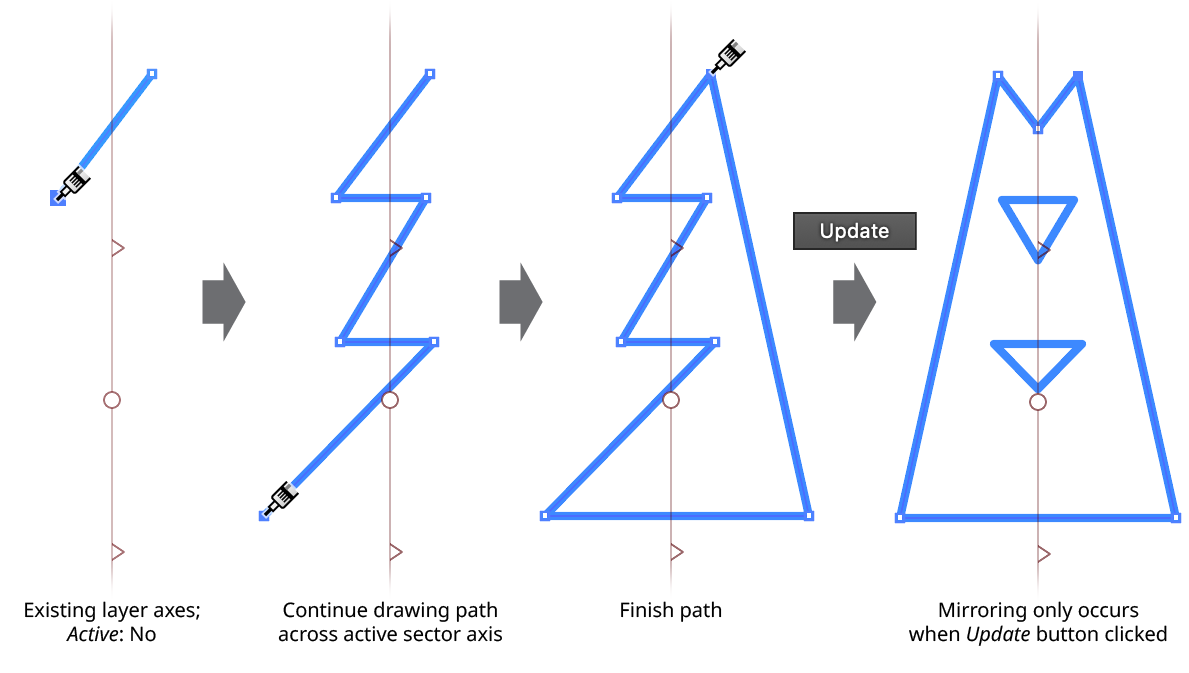
MirrorMe Update Button
7. Remove Axes button
Removes existing MirrorMe symmetry axes from the current layer. Art which has been mirrored using these axes is left in place and unlocked, unless the Option/Alt key is held down, in which case it is deleted.
8. Origin Point
Specifies the X and Y coordinates of the origin (center point) of the symmetry axes.
9. Angle
Specifies the rotation angle of the symmetry axes, defined as the angle of the leading axis of the active sector (moving in a counterclockwise direction).
10. Number of Axes
Specifies the number of symmetry axes, from 1 to 72.
11. Trim and Join Paths
When enabled (the default), paths which cross one of the two axes bounding the active sector will be trimmed off at those axes and joined with their mirrored counterparts, creating closed or compound paths when appropriate. When disabled, paths are simply mirrored across all axes, like other art types, and may end up overlapping.
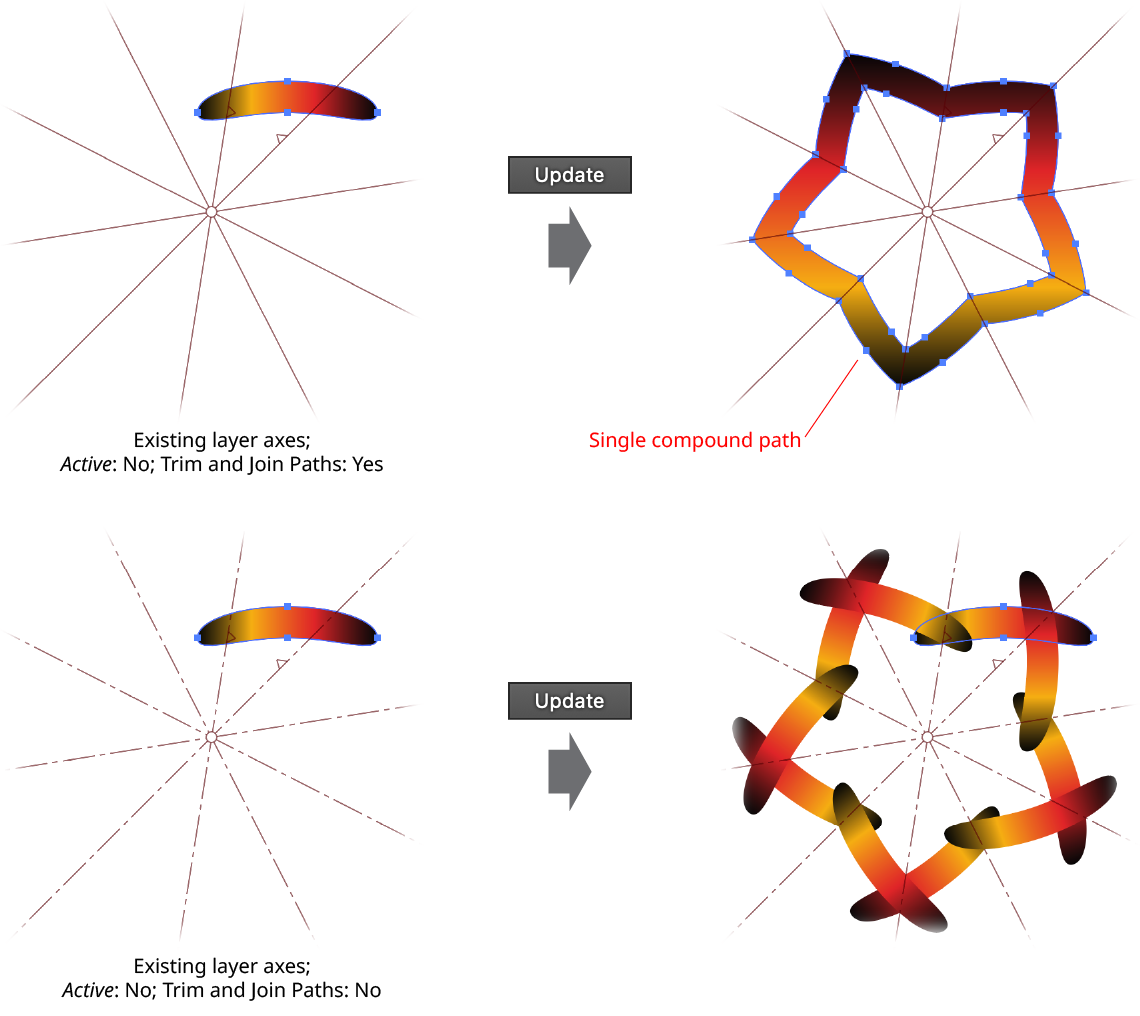
MirrorMe Trim and Join Paths
12. Active Sector Mask
The checkbox enables or disables the active sector mask option, which makes it easier to see the active sector in a busy design by drawing a semi-transparent overlay above the other sectors. When enabled, the opacity of the white color in the overlay can be specified.
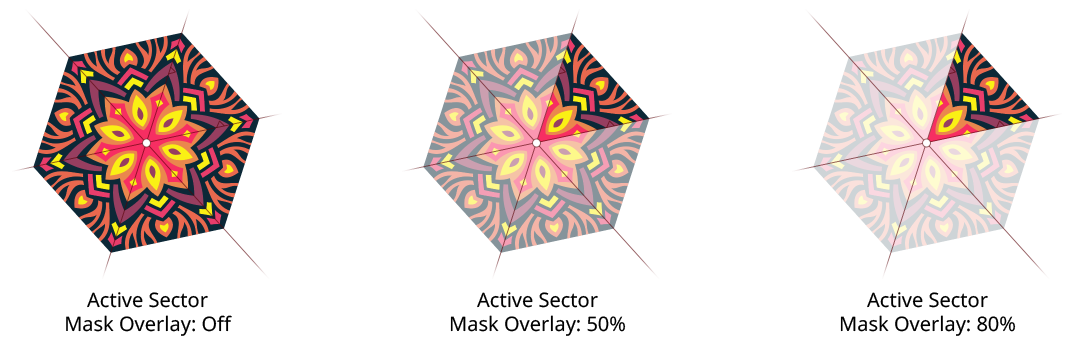
MirrorMe Active Sector Mask Overlay
Illustrator Location:
Illustrator Main Menu > Window > Astute Graphics > Gradient Forge
Contains controls which change the positions of one or more stops.
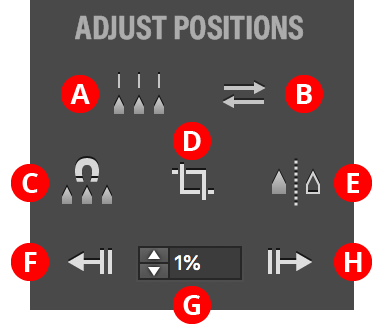
Gradient Forge Panel Adjust Positions Section
A. Distribute Button
Available when three or more contiguous stops are selected (or when no stops are selected, in which case it acts as all stops are selected); distributes their positions equally. The first and last selected stops are not moved. If Option/Alt is held, a dialog is shown allowing you to specify an eased distribution. In this case the stops are not distributed evenly, but gradually get closer together or further apart.
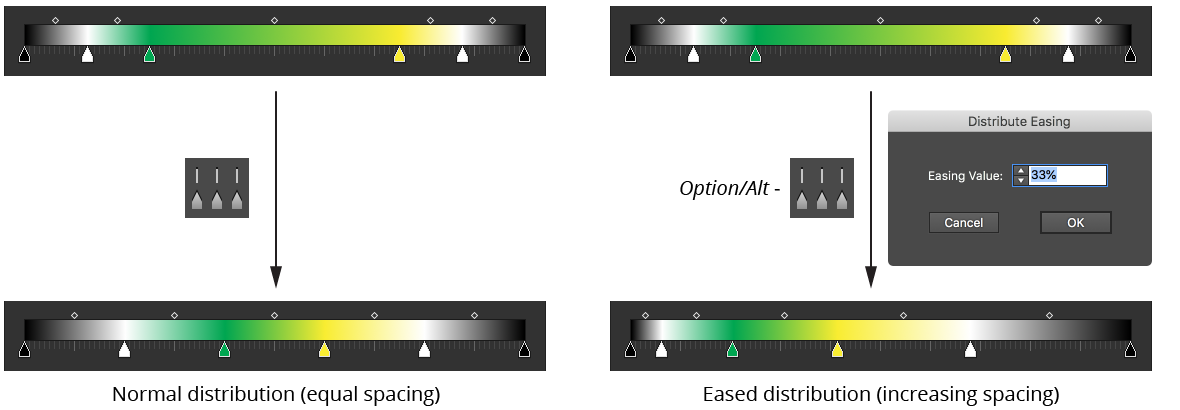
Gradient Forge Panel Distribute Stops Example
B. Reverse Gradient Button
Available when two or more contiguous stops are selected (or when no stops are selected, in which case it acts as all stops are selected); reverse the order of the stops, as per the native Gradient panel Reverse Gradient button. Affected midpoints will have their locations inverted to keep the look of the gradient identical.
C. Snap Button
Snaps all selected stop locations to multiples of the Snap Value.
D. Crop Button
Available when the stop selection is contiguous (or, when no stops are selected, if the first stop is not at 0% or the last stop is not at 100%); removes all unselected stops and scales the remaining stops such that the gradient runs full-length (0% to 100%).
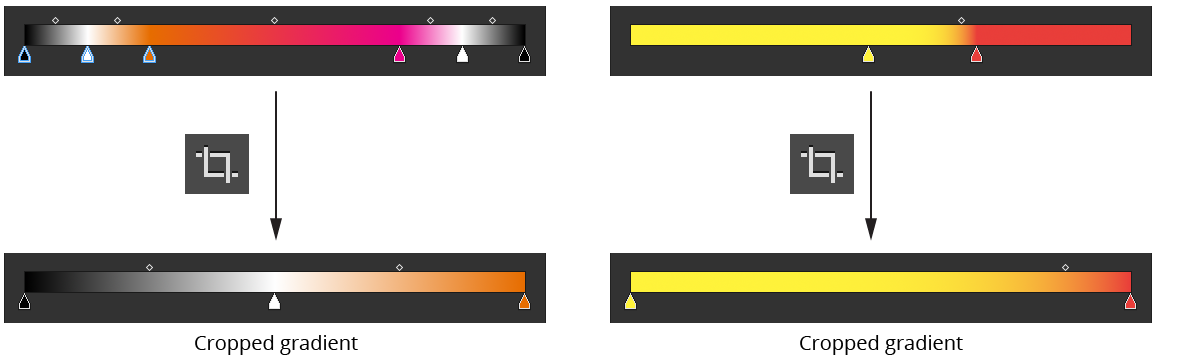
Gradient Forge Panel Crop Example
E. Mirror Button
Mirrors the entire gradient along its right-hand side. Stop selection is ignored.

Gradient Forge Panel Mirror Example
F. Move Left Button
Moves the selected stops’ locations to the left by the amount specified in the Move Value. Holding Shift moves them by ten times the specified value. Once a stop reaches the start of the gradient, it (and any additionally selected stops) cannot be moved any further left.
G. Move Value
The amount by which selected stops are moved using the Move Left and Move Right buttons.
H. Move Right Button
Moves the selected stops’ locations to the right by the amount specified in the Move Value. Holding Shift moves them by ten times the specified value. Once a stop reaches the end of the gradient, it (and any additionally selected stops) cannot be moved any further right.