 Creating New Shapes
Dynamic Shapes can be created with the tool in three ways: by doubleclicking the artboard, by click-and-dragging on the artboard, or by converting an existing ordinary path (typically drawn with one of Illustrator’s native shape tools) into a Dynamic Shape.
Doubleclicking
Doubleclicking creates a new shape with its transformation point positioned at the location that was doubleclicked. The shape’s type, rotation, size, and any other parameters are taken from the panel settings, which are picked up from the previous created or edited shape. The shape must be subsequently edited in a separate step.
Dragging
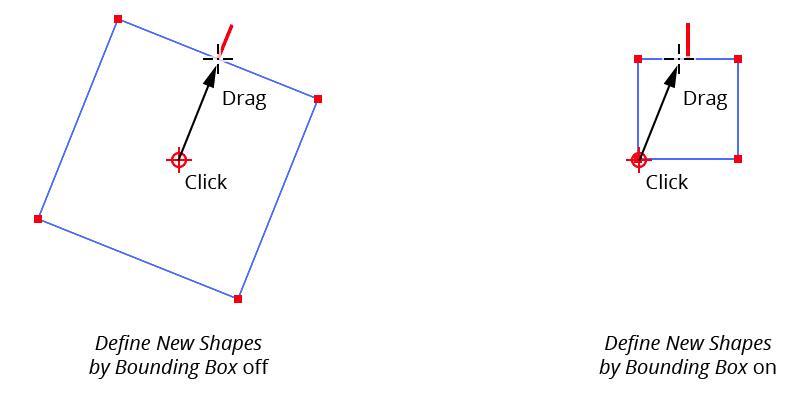
When dragging to create a new shape, there are two methods you can use, depending on the Define New Shapes by Bounding Box preference:

Dynamic Shape Creation
In both cases the transformation point is placed at the initial-click location. However, when the preference is turned off (“Draw from Center”), the transformation point becomes the shape’s center; the shape’s size is determined by the distance from the cursor to the clicked point, and the shape’s rotation is determined by the angle from the cursor to the clicked point.
When the preference is turned on (“Draw from Edge”), the transformation point becomes one of the four corners of the bounding box of the shape (which corner depends on drag direction); the shape’s size is determined by the horizontal and vertical offsets of the cursor, and the shape’s rotation is always set to the overall constrain angle.
When drawing shapes with independent widths and heights (such as rectangles, ellipses, crosses), the Bound Box method of drawing is usually more intuitive.
The Define New Shapes by Bounding Box preference can be changed any time during the drag by pressing the S key.
In addition to S, there are a number of other keypresses which can be used while drag-creating a shape. We recommend keeping the Astute Buddy panel open for easy reference.
Shift: Constrains the angle of the shape to 45° increments around the general constrain angle (not applicable when drawing from the edge).
Option/Alt: Allows adjustment of the shape’s corners (for standard shapes which have corners). When
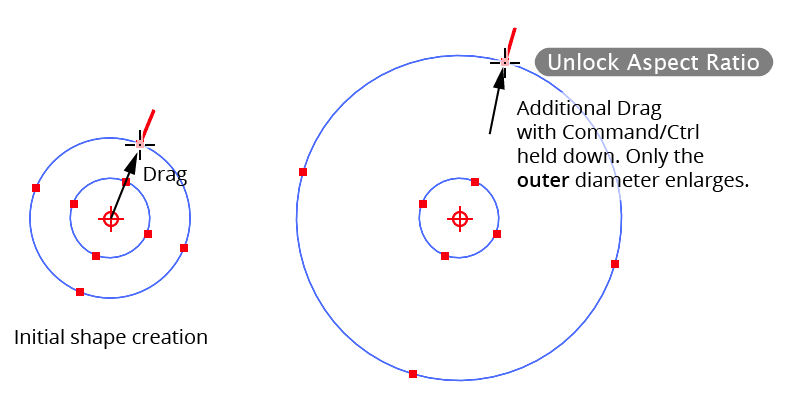
Option/Altis held down, moving the cursor changes the corner radii rather than the shape’s size. WhenOption/Altis released, any corners are retained and cursor motion returns to changing the shape’s size.Command/Ctrl: Unlocks the shape’s aspect ratio, when applicable. For example, when drawing a Dynamic Rectangle (with Bounding Box off), the ratio between the width to height is initially set to whatever value was used previously; as the rectangle gets bigger, this ratio is maintained. But when
Command/Ctrlis pressed, the cursor’s motion only affects the rectangle’s width, thereby changing the aspect ratio. Likewise, when drawing a Dynamic Donut,Command/Ctrlchanges only the outside diameter rather than both diameters in proportion:

Dynamic Shapes Creation Aspect Ratio
Space: Moves the entire shape without changing its size or rotation.
Up Arrow/Down Arrow: For circles, ellipses, polygons, and donuts, changes the number of sides/corners. For arrows, changes the tip angle. For clouds, changes the puffiness. For crescents, changes the outer circumference fraction. For crosses, changes the offset. For gears, changes the tooth count. For hearts, changes the depth. For speech bubbles, changes the tail height.
Left Arrow/Right Arrow: For standard shapes, changes the corner radii. For arrows and crosses, changes the thickness. For clouds, changes the type. For crescents, changes the inner fraction. For gears, changes the tooth height. For hearts, changes the point value. For speech bubbles, changes the tip position.
1 through 7: Changes the type of shape directly to one of the seven basic types displayed on the top row of buttons on the Dynamic Shapes panel (where
1equals square,2equals circle, etc).9: Changes the type of shape to the previous type, as displayed on the Dynamic Shapes panel. For example, when drawing a Dynamic Gear, pressing
9would change the shape to a Dynamic Cross.0: Changes the type of shape to the next type, as displayed on the Dynamic Shapes panel. For example, when drawing a Dynamic Gear, pressing
0would change the shape to a Dynamic Heart.B: Makes the shape “basic.” This resets the shape to its default appearance: corners are removed, the aspect ratio (if applicable) is reset to its default value, and the number of segments, sides or corners is reset (for example, circles are given four segments; stars are given five corners, and polygons are givensix sides). Standard shapes have any slicing removed, and advanced shapes have other parameters reset to their defaults. The shape’s size and angle are not changed.
C: For standard shapes which have corners, changes the corner type (Regular, Negative, or Chamfered). If the corner radius is set to zero, no change will be immediately visible.
R: For Dynamic Stars with at least five points, adjusts the aspect ratio so that sides on either side of each arm are parallel.
U: Temporarily disables Smart Guides, if they were enabled when the drag started.
X: Toggles “Shape Replace,” if applicable. Shape Replace is available when a single path (or compound path) is selected before starting to draw a new Dynamic Shape. When enabled, the geometry of the existing path will be replaced by that of the drawn shape, while not affecting the path’s style, stacking order, group membership, etc.
Converting
The Dynamic Shapes tool can convert an ordinary Illustrator path into a Dynamic Shape (assuming its geometry is correct) by placing the cursor over the path. If the shape is able to be converted, an annotation next to the cursor will show “Shape Recognized” and annotations (in green) will be drawn over the shape. Clicking then finalizes the conversion of the shape.

Dynamic Shape Recognition
When converting paths to shapes, Dynamic Shapes keeps the starting point of the path in the same spot when possible, which may lead to unexpected rotation angles. A quick way to fix this issue is addressed later (see Dynamic Shapes Panel: Size Section). To convert multiple paths into Dynamic Shapes in one step, use the panel flyout menu item (see Dynamic Shapes Panel: Flyout Menu).